
Note to all you programmers: Most of the links in this document lead to additional detail, if you're interested in the really really gritty parts of this implementation.
Note to all you nit-picky programmers: In this text I use the term Assembly Language to refer to both Assembly Language and Machine Language (the compiled result of Assembly Language.) This is to keep things simple. Hah! Simple...
It's the year 1991. You're a teenage computer geek.
You've just upgraded to your first "16-bit" computer, and the possibilities are infinite. To relieve the crushing boredom of your High School coursework, you and your friends embark on the computer geek equivalent of forming a heavy metal band: You create your own video game.
You meet on the benches during lunch hour, and pass around crude plans scribbled on graph paper. You assign each other impressive titles like "Master Programmer", "Sound Designer", and "Area Data Input". You draw circles and arrows all over fuzzy dot-matrix printouts of code, and argue over them between episodes of "Ren and Stimpy". You swap 3.5" disks around like furtive secret agents. You consume incredible quantities of soda. Your parents look at your owlish eyes - and possibly your slipping grades - and wonder aloud if you're "on drugs".
If the above sounds familiar to you, then the rest of this article may prove interesting. It uses the game my friends and I started - but didn't finish - in High School, in order to describe the programming acrobatics we had to perform while writing it. Nowadays, the content of the game itself is only good for an embarrassing laugh, but I feel that the code we hammered out shows the unique challenges of a bygone era, which should be remembered.

This is an Apple IIgs. The CPU is inside the box on the left, underneath that external hard drive that's missing a cover. When you flip the power switch of an Apple IIgs, you don't hear any fans spin up. The box is dead quiet, and stays that way no matter what the computer is doing. How did Apple accomplish such an engineering feat? Easy. The Apple IIgs is SLOW. Fist-clenchingly, a g o n iz in gly slow. I grit my teeth and shriek, and feel sick, just thinking about it. You honestly have no idea how slow this god-forsaken toast-rack of a computer is ... unless you've tried to make it go fast.
This is the first level of "Super Merryo Trolls". Imagine it flickering on the little monitor in the previous picture. Yes, the game looks suspiciously familiar. It's a rip-off of Super Mario Brothers, though all the blocks are drawn in a 20x16 aspect ratio instead of the usual 16x16. The main character, Guido, has a head that looks like a pixel-exact rip-off of Mario from Super Mario World. (This is nearly the case. You'd probably never notice it, but Mario's eyes both slant forward, while Guido's slant inward at each other, giving him a slightly more menacing look.)
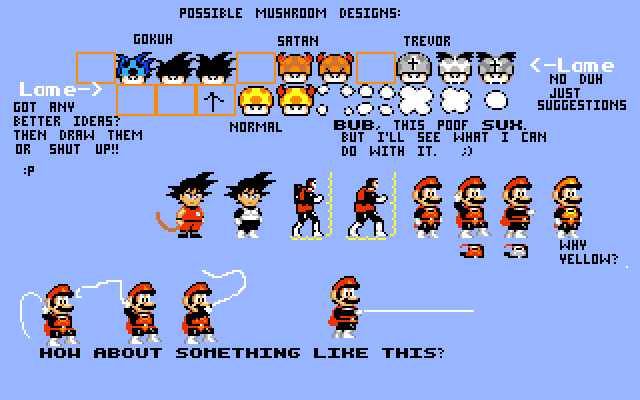
Our idea was to start with the game looking as conventional as possible, and then quickly introduce the sick and twisted elements we never got to see in any "legitimate" Mario games. Those "legitimate" games ran on store-bought consoles like the Super Nintendo and the Sega Master System. They had specialized hardware, and usually managed a smooth 60 frames per second. The best full-screen animation we could manage on a stock Apple IIgs was around 20 frames per second.
During the decade when first-person-shooter games were exploding, everyone learned that the most important benchmark was the frame rate. A low frame rate meant that a game was unplayable. Developers added configuration screens, so that players could turn off the fancy visual enhancements, sacrificing graphical quality for speed. This dichotomy - of fast graphics versus fancy graphics - has always existed. But since the Apple IIgs only came in one flavor and ran at one speed, there was no reason to give game players a configuration screen. (Their choice would have been between slow and slow.) Instead, it was a different uphill battle for the programmers: If they were tricky, the games they produced were playable. If they weren't tricky, they didn't have a game, they had a slideshow.
So, what's an aspiring team of High School nerds to do, in pursuit of programming fortune and glory? How do we make a game so cool that even we would play it, on hardware so slow that even the law of gravity can't accelerate it?
We've got to get tricky. In order to get the highest possible performance out of the Apple IIgs, we'll be writing everything in Assembly Language, so we can have absolute control over every cycle of the computer's CPU.
Those of you familiar with Assembly Language may wish to skip this section. Those of you too young to remember when it was called 'Assembler' are encouraged to read it, and laugh at how crude it was before branch prediction and vector instructions got involved.
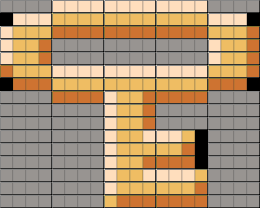
This is a block, one of many that compose the two-dimensional levels of Super Merryo Trolls. To make fast animation, and a playable game, we need to draw lots of these on the screen very quickly. No matter what solution we choose, it's going to involve repetition, because the largest amount of memory the Apple IIgs can move in a single CPU cycle is a one byte - and a block like the one pictured above is 160 bytes of data.

I need to stress at this point, for all you modern readers who have done graphics programming: When you're drawing things on the Apple IIgs, the CPU is all you get. There is no GPU. There is no VRAM. There is no blitter. If you want to move a byte of pixels to the screen, you have to do it yourself.
Think of a construction crew, with forklifts and dumptrucks, moving tons of material wherever you tell them. That's modern graphics hardware. Now think of the drop-claw game at the pizza parlor...
So the crucial question to ask is, what's the quickest way to move a piece of data from one place to another inside the Apple IIgs? What Assembly Language instruction, or combination of them, gets the job done in the fewest number of CPU cycles? The answer lies in this handy reference chart I drew in 1992:
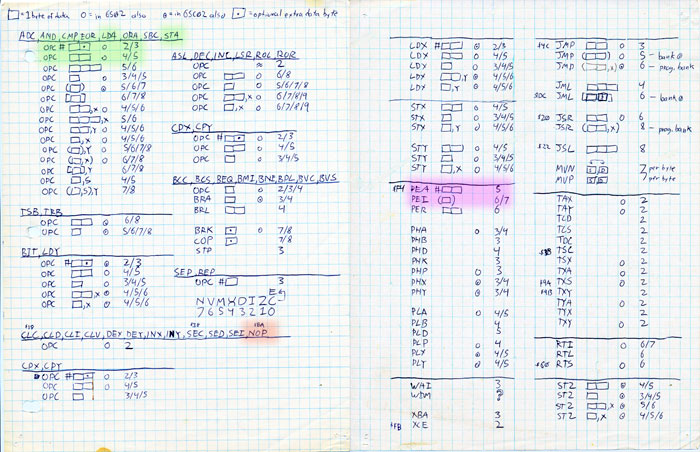
This is a chart of the Apple IIgs Assembly Language instruction set. Assembly Language is the name for the tiny fragments of computer code that the Apple IIgs (like every other computer) runs on, at the most basic level. Each Assembly Language instruction has a three-letter name, like "LDA", "STA", "SBC", or "PHB". The letters in the name describe what the instruction does. For example, "LDA": Load the "A" register with a number. "STA": Store the number from the "A" register somewhere in memory. Every computer program you've ever used is composed of tiny math operations just like these, even huge bloated ones like Garage Band.
Strange, isn't it? It's like taking a close look at the Eiffel Tower and discovering that the entire structure is made from little bits of uncooked macaroni, and then looking around and realizing that the whole city of Paris is little bits of macaroni. This type of madness is why programmers have to do their work sitting down.
Anyway, the most straightforward way to move a block from here to there is to load a piece of it into the CPU's "A" register, and then write the "A" register out to someplace else. To do that in Assembly Language, we'd use the "Load A" and "Store A" instructions like so:
(Those hex numbers on the right are a more accurate representation of what this looks like inside the computer. It's all numbers, but the numbers in a computer's memory can lead a kind of double life: A number can be just a number, or it can represent an Assembly Language instruction. As the CPU rolls along, it interprets some of the numbers as instructions, and some of the numbers that follow are "arguments", used to inform the behavior of the instruction. In this case, "LDA" is $AF, and the argument "$021300" is flipped around and split apart into "$00 $13 $02", and so on.)
This example isn't very practical because it's too specific. It's saying, "Load A with the number we find at $021300, and store that number at $012000." When the computer runs this code, it always loads from one exact spot, and stores in another exact spot. We'd have to write a whole lot of "LDA" and "STA" commands to move an entire block ... and we'd only be able to draw it to one exact place on the screen! Nope, not practical.
We can make this code more flexible by involving a variable, like the "X" register. By adding the "X" register to each memory location, we can refer to many different locations with the same code:
If "X" is set to zero beforehand, this code does the same thing as the first example. But if we set "X" to 2, this code will load from $021302 instead of $021300, and store to $012002 instead of $012000. This is very useful, because now we can set up a loop - running this code over and over with different values for "X" - and move a big block of data around. Our problem appears to be solved. But how fast does this code go?
Inside the computer, each Assembly Language instruction takes a certain number of CPU cycles to execute. Some instructions use only a few cycles and are executed quickly, while others occupy the machine for a long time. Take a look at the green-shaded area in the reference chart. It details the minimum number of CPU cycles that "LDA" and "STA" require to get their work done. For "STA" to store a 16-bit value (two bytes of data) into memory, at least five cycles are required. For "LDA" to load 16 bits into "A", at least three cycles are required. So in total, it takes 8 cycles to move 2 bytes. Multiply that by a whole screen full of data, and you're looking at 128,000 CPU cycles. That's a freaking long time inside an Apple IIgs. I could bake a pizza in that time.

(As an aside, there are Assembly Language instructions in the IIgs called "MVN" and "MVP" that actually cause big chunks of memory to shift around. If you find these on the chart, and look at the cycle counts, you'll discover that these instructions require 7 cycles per byte. That's 224,000 cycles to move a screen. I could bake and eat a pizza in that time.)
So what else can we do?
Probably the strangest trick employed in making Super Merryo Trolls go fast is the "PEA Field". No, it's not a winter crop, nor is it some alien death ray from outer space. "PEA" is an Assembly Language instruction. You can see it in the purple-shaded region of the reference chart. "PEA" stands for "Push Effective Address". (That's not a very straightforward name, actually.) In the computer's memory, the instruction is represented by the number $F4.
The "PEA" instruction requires a 16-bit argument to do its work, which is found right after it in memory. So if you put the sequence "$F4 $07 $07" into memory and then tell the computer to execute that, it will execute "PEA #$0707". But what does "PEA" do with this number?
It adds it to a structure called "the stack". "The stack" is a block of memory that the CPU uses to keep track of where it's been, so it can eventually return there. Depending on how complicated the computer's current job is, the stack grows and shrinks, just like a stack of papers on your desk at work. Generally, a programmer doesn't have to worry about the stack, because it's managed automatically - address numbers are pushed and pulled from it at the appropriate times by the CPU during the execution of a program.
But sometimes a programmer may want to make the CPU behave in non-linear ways, and one method for doing that is to futz with the contents of the stack. That's exactly what the "PEA" instruction is designed for. This sequence of PEA instructions:
... will push three 16-bit numbers onto the stack. So "$1300 $1902 $3387" will appear in the area of memory where the stack is kept. Later on, the CPU may pull those numbers off the stack, and use them to jump somewhere new, or the programmer may pull them off manually, effectively using the stack as temporary storage.
Now hold on a minute here ... there's loading and storing taking place, and according to the chart, the "PEA" instruction takes only five cycles to move a 16-bit value! (Check out the purple-shaded region.) That's a bargain! In fact, it's the best bargain the hardware has to offer. A whole string of "PEA" instructions will push a whole string of data into memory, and there's not even an "X" register to manage. Wouldn't it be nice if we could move data to the screen this way?
It just so happens we can. With some memory-shadowing tomfoolery, it is possible to make the Apple IIgs use the same memory for both the stack and the screen. A "PEA" instruction will then write data directly to the screen.
Here's the block we want to move. The thick dividing lines in the illustration separate the block into wide rectangles, with four pixels inside each. Each of these 80 rectangles is 16 bits worth of data. A single "PEA" instruction can push 16 bits of data onto the stack. What if we created a huge string of "PEA" instructions that, when executed by the CPU, "pushed" this block onto the screen?
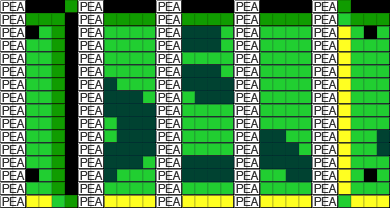
Here we've broken the block into 16-bit chunks, and inserted a "PEA" instruction in front of each chunk. (Remember, a "PEA" instruction is really just the number $F4, and pixel data is also just numbers, so all we're really doing is inserting numbers in between numbers here.) You may wonder why the block looks scrambled now. Well, there's something I haven't told you about the stack in the Apple IIgs. It runs backwards in memory.
Yep, it's true. If you execute a bunch of "PEA" instructions, one after the other, each piece of stack data is stored in memory just before the previous one. By contrast, programs in memory are executed one instruction at a time with each instruction just after the previous one. So while the program runs forward, the stack is drawn backwards. To make things come out right, the program needs to push its 16-bit chunks in reverse order!
In addition, the rows of pixels on the screen are represented in memory from top to bottom. If we're drawing backwards, we should push the last row first. In total, we need to turn our data upside down and backwards before we convert it into PEA instructions.
This is a cute solution for drawing a single block, but if we just used it to draw one block at a time, we'd run into problems. Every time we finish one row of pixels, we have to do some math on the stack pointer so we can start drawing the next row in the right place on the screen. That costs precious CPU time - so much that it threatens to defeat the purpose of our exercise.
But what if we don't confine ourselves to a single block? What if we draw the entire screen, all at once, in backwards order using "PEA" instructions? That way, the stack can just chug away across the screen, and wrap up to the previous line all by itself.

Now we don't need to do any math on the stack pointer, because each row of pixels naturally begins where the previous one left off. It's all "PEA" as far as the eye can see. A chunk of 16,000 "PEA" instructions can draw a whole screen of data, and it takes a mere 80,000 cycles, which is almost 40% faster than the previous solution. I could still bake a pizza in that time, but I'd have to preheat the oven.
This bizarre method is the fastest way to redraw the entire screen on the Apple IIgs, period. I'm sure the hardware designers didn't plan it this way. If they did, well, ... shame on them! This is a total hack!
There are other methods that appear to redraw everything (Fill mode, the TSB operator, etc), but they all rely on restricting what you're allowed to draw, or using a lower resolution. This method works no matter what you're drawing, because it refreshes all the data, every time. In Super Merryo Trolls, we kept this huge tapestry of "PEA" instructions in memory bank $07, and we called it "The PEA Field".
There is also another very important advantage to using this method. If you want to redraw everything four pixels to the right, all you need to do is skip the first PEA instruction in the chain, and tack a new one onto the end. Repeat the procedure, and your data scrolls continuously across the screen.

Reverse the procedure, and you can scroll back in the other direction just as easily. While the bulk of the PEA Field sits still in memory, we achieve animation by fiddling with the ends just before we "execute" it. It's similar to the way tank treads work: The tread lays still on the ground, but by fiddling with the ends, we can make a vehicle roll across the landscape.
If all we did was add and remove PEA instructions, the graphics would loop around the screen repeatedly. But when you're playing a game you want the scenery to change, not repeat like some cheap Warner Bros. cartoon - so you also need to draw extra stripes of material into the PEA Field as it scrolls.
You don't have to limit yourself to PEA instructions, of course. You can toss in other Assembly Language codes anywhere you want, to achieve interesting visual effects. The most amusing one we cooked up for Super Merryo Trolls was called the "Heat Wave" effect. Every time the PEA Field finished drawing a line of pixels, we would do some crafty math to the stack pointer, shifting it forward or back just a little bit so the next line got drawn in a different place. We would change the sequence of amounts with each frame, making the distortion appear to move up the screen, like so:
Of course, if you can change the stack pointer a little, you can change it a lot. In "Techno Land" there was a button that, when you stomped on it, would turn the whole display upside down, sprites and all. For no reason.
The most impressive variation that the PEA Field allowed was two-layer scrolling, though the implementation had problems because it made sprite drawing very complicated. We made a proof-of-concept demo that would successfully scroll, but we were never able to integrate it with the game:
This demo played music while scrolling a foreground region over a background region which was further subdivided into five horizontally scrolling planes. On top of everything, semi-transparent raindrops fell slowly down the screen. It looks like monkey poop now, but believe me, in 1994 it was a miracle.
That red stripe at the bottom of the display is a kind of rudimentary CPU-meter: By changing the "border color" register from black to red for just a fraction of each 60th of a second, then doing some processing, then switching the register back to black, you could get a visual indication of how much CPU time a task took to complete. Apple IIgs developers used this technique a lot to balance their CPU "budget".
Foreground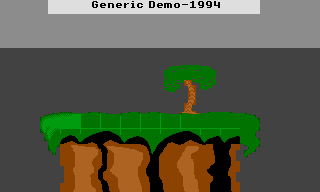 | Background: |
So how did two-layer scrolling work? Well, we started by making the foreground picture into a PEA Field. Then we modified all the PEA instructions that pushed gray pixels, changing them into something else. Instead of:
We wrote:
We overwrote each PEA with two instructions, a PEI and a NOP. You may ask: How can two instructions fit on top of one? In this case it's possible because the original PEA instruction takes a two-byte argument (The "$11 $11" portion of our "$F4 $11 $11" example), making each occurrence of PEA occupy three bytes. By contrast, PEI requires a one-byte argument, so it occupies two bytes total, and NOP requires no argument at all. Two bytes for PEI plus one byte for NOP occupies exactly the space of a three-byte PEA. Let's examine this visually.
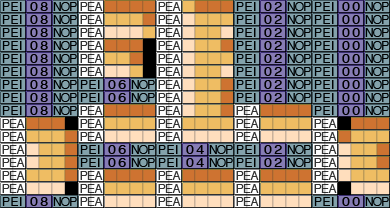
Here's a gray block that's got a key drawn on it. We want the key to appear on the first layer, but we want to get rid of the gray, and instead show the background layer beyond it. The first thing we'll do is stick this block into a PEA Field.

Next, we replace each PEA of gray pixels with a PEI and a NOP, so our code looks like this:
If we execute this code, the PEA instructions will draw the key to the screen, as usual - but what happens at the spots with the PEI/NOP? We already know what has to happen in general: Two bytes need to get pushed onto the stack, just like the original PEA instruction would have done. If the end result is anything else, the picture of the key will get all mangled on its way to the screen. So the PEI/NOP has to get two bytes from somewhere - but where exactly?
First, the PEI instruction. PEI stands for "Push Effective Indirect". It takes its one-byte argument - be it a $00 or an $04 or a $7E - and treats it like a memory address, loading a two-byte value from that address on the "Direct Page", and pushing that value onto the stack. So unlike PEA, which just pushes its argument directly onto the stack, PEI takes its argument and uses it to load from somewhere else, then pushes that value onto the stack. That's the "Indirect" part of "Push Effective Indirect".
Okay, so we load from memory, instead of pushing directly - so what? What's so special about that? The secret lies in this new structure called the Direct Page. The Direct Page isn't a fixed place in memory, it's more like a little window-frame that you can move around on top of memory. It's a window-frame that's exactly $100 bytes wide, and you can refer to whatever's inside it by using Direct Page addressing.
A few examples will make this easy to understand. The location of the Direct Page is controlled by setting a pointer ("D") inside the CPU. If you set D to be $0400, and then execute the instruction "LDA $02", the CPU will add the $0400 to the $02 and come up with memory address $0402 - and load the "A" register with whatever's there. If you then say "STA $10", the CPU will deposit the contents of A into location $0410.
If you then set D to $2222, and do a "LDA $33", the CPU will add $2222 to $33 and load a value from memory address $2255. So, using the Direct Page, you can give the computer a little two-digit address, and it will extrapolate that into a complete address for you. That's Direct Page addressing.
Why is it useful? Consider a typical programming situation, where you have maybe 15 variables that you need to keep referring to over and over. If you put all those variables next to each other in memory, and then set the Direct Page pointer to a spot nearby, you can refer to all of them using that two-digit shorthand. Additional Assembly Language instructions become available too, if you use the Direct Page - funky indirect indexed addressing modes like "LDA ($06,S),Y". Hoo-hah!
Here, we're using the Direct Page to accomplish something it wasn't designed for. Of course. We're taking advantage of the fact that we can use the same address numbers - $00, $02, $04, et cetera - to refer to a different region of memory every time we run through the PEA Field. If we set D to be $0100, then the sequence:
Will refer to memory locations $0124, $0122, and $0120. But if we set D to be $0101, and then run through the exact same code, the code will instead refer to $0125, $0123, and $0121. The same PEI instructions will load - and push - data from one byte higher in memory than before!
And that is the secret of two-layer scrolling. In our example above, the PEA Field draws the picture of the key to the screen, but the PEI instructions load from wherever the Direct Page happens to be pointing, and draw that to the screen instead. Chop off a PEA, increment D by one, then run through it again - and you've just scrolled the foreground four pixels, and the background only two. Viola! Two layer scrolling.
But what about the NOP instruction? What's that for? Guess what: The NOP instruction does nothing. The computer just skips right over it. It's the PEI instruction here that does all the work. So why is the NOP there at all? To occupy that third byte! Whatever we replace the PEA instruction with has to occupy exactly three bytes, or it won't fit in the opening.
Now let's pause and consider that for a second - we're taking a useless instruction that does nothing except waste CPU cycles, and using it as filler so that our code occupies more space in memory than it otherwise would. It seems crazy, but it's actually very useful: It ensures that each fragment of the PEA field is always three bytes in size. Therefore, we can treat it like a big grid, and find any point on it quickly. We rely heavily on that grid for things like sprite drawing (discussed later) and localized visual effects.
Deliberate code-bloat? Drawing graphics with the stack? Treating the Direct Page like a copy machine? How much worse did this code get?
Plenty.